Not all abdominal exercises are created equal when it comes to building midsection muscle. If you are trying to target the stubborn lower abdominal muscles of the torso, you know that it is not easy. There is only one muscle in the abdominal muscles, the rectus abdominis, and most abdominal exercises practiced in the gym primarily target the upper part of the abdominal muscles. (While we're on the subject of abs, here are some abdominal exercises you should stop doing right now.)
In my quest for the perfect abs, I turned to one of my favorite YouTube trainers, Pamela Reif, and unrolled my yoga mat to try her lower abs workout. (If you're looking for a new yoga mat for your workout, you can find the best yoga mats for home workouts here.) The workout has more than 18 million views on YouTube, and fitness influencers have revealed that it is one of their most requested videos.
Before you begin, there is a big but important caveat. You can do as many sit-ups and abs as you want, but to lose fat, you need to limit the calories you eat and increase the calories you consume. [Studies have shown that a large waist size makes you more susceptible to diseases such as heart disease, diabetes, and some cancers. Also, a stronger core will help you run faster and prevent back pain.
Looking for more inspiration. We found the best free abdominal workout here.
The Pamela Reif-style abdominal workout is a 10-minute workout with 20 exercises, each lasting 30 seconds. Since it is super important to keep the lower back pressed against the floor to train the lower abs, Reif adds a few activation exercises to help train what this should feel like.
In the description of the workout, Reif writes This is vital for your health and essential for working out your lower abdomen. If your lower back is not flat on the mat, you will not be able to work your abs. The legs should only be moved as far down as possible (e.g. during leg lifts). It doesn't matter if your range of motion is limited: it's fine. You will improve with time."
If you want to look at the exercises before you begin, here's what to look at: work solidly for 10 minutes without a break, but beginners should press pause if necessary. I omitted the activation exercise, but be sure to do it to get a feel for the position of the hips. [15] [16] Crunches and leg lifts: Crunch and simultaneously raise and lower the legs. At the apex of the crunch, raise the legs to the ceiling while keeping your core engaged.
Scissor Kicks: With your back pressed against the floor and your core engaged, lift your legs high enough to keep your head and neck off the floor and your back off the mat. Scissor kick the legs up, down, left and right. [19] [20] Pullover and toe touch: Begin crunches with arms extended behind the head and legs extended outward. While crunching up, extend arms forward, knees inward, and touch hands to feet. [21] [22] Circle: Lying on your back, raise both legs as high as possible without lifting your back off the mat, and then raise and lower both legs out to the sides as you circle. [23] [24] Leg pullovers: At this point, only insert one knee, alternating which leg is inserted for 30 seconds. [25] [26] Butterfly Kick Out: This is a reverse crunch that incorporates butterfly to tap. Lie on your back, engage your core, and lift your hips off the mat. While lowering your hips, drop your knees to the side with your heels attached to each other. Tap heels to floor, return to knees and repeat.
Ab Hold With your back on the floor, extend both legs at an angle, lift your head and neck off the floor, and extend your arms out to your sides. Hold for 30 seconds with core strength.
Mountain climber and hold: Think of this as a very slow mountain climber. Keeping your core engaged, raise one knee up to your chest from the plank position, pause, then return to the starting position and do the same on the other side.
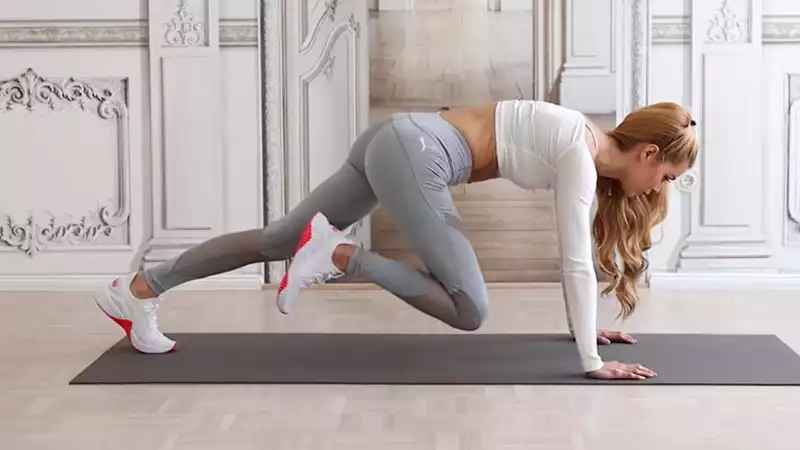
Bare hold: With your stomach tucked in, get into a table top position on your hands and knees and lift your knees 2-3 cm off the ground. Hold as you are.
Kick and front up: Lie on your back, kick both legs out away from your body, and lift your hips toward the ceiling while lifting your hips off the mat using your torso.
[9] 1-Leg Pum Knife: From an ab hold position, with arms and legs extended and head and neck off the floor, lift one leg at a time and crunch your torso up to touch the toes of the extended leg. [10] [11] Plank and lower ab crunch: From the plank position, turn your back and be aware of sucking your lower abdomen into your spine, then return to the plank. Continue this for 30 seconds.If you've read any of the other workout reviews in Tom's Guide, you've heard about my riding accident. This workout is by far the best abdominal workout I have ever done in terms of back care.
I have spent a lot of time with my physical therapist learning how to press my back into the floor and tilt my pelvis slightly during abdominal exercises. Thinking about the health of the spine is very, very important, especially for people who spend a lot of time sitting at a desk. [The workout itself was fast-paced, challenging, and made my inner core muscles tremble, reminding me that I had worked my core. Rafe talked me through the workout without stopping, so I was able to mute the video and follow along while continuing to listen to the podcast (I did the workout again afterwards, and I have to say the playlist is great).
Now, I warn you, it will be the longest 10 minutes of your life, but this abdominal exercise is something you will want to do again and again, especially if you suffer from back pain. You will want to do this abdominal exercise again and again, especially if you suffer from back pain. I will definitely be re-using these once my torso stops shaking.
.


Comments