Halloween is my favorite holiday. However, finding tasteful Halloween decorations is not always easy, and quality items can be expensive when trying to decorate a large space in a spooky spirit.
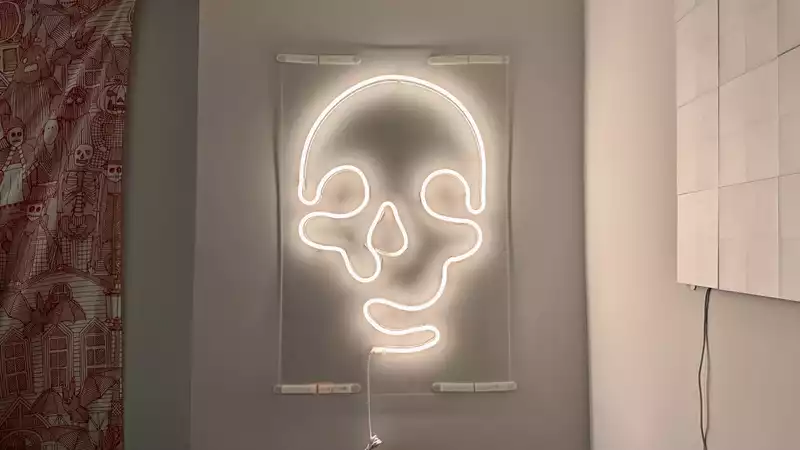
I'm no stranger to DIY projects. So when I stumbled across this massive $1,200 colorful sugar skull neon sign on Pinterest, I started looking into ways I could make something similar myself for much less.
There is no shortage of strip lights made to replicate the effect of real neon lights; just search Amazon for "neon strip lights." But I wanted a product that was smart, could be stored with other decorations for months after Halloween, and had a good reputation: the "Govee RGBIC Neon Rope Light" ($99) and the "GE Lighting CYNC Dynamic Effects Smart LED Neon Shape Light" ($119), and while I like both brands equally, I chose the latter.
The next task was to figure out how to temporarily mount the lights. I know from experience that smart light strips can peel paint and stain walls when removed. I also didn't want to have skeletons on the wall all year round, so I took the DIY neon light concept and figured a ⅛-inch clear acrylic sheet would make a good mounting plate. However, any acrylic sheet would be fine.
Once the materials arrived, I got to work on the craft. I must confess that I can be rather hasty (and a bit ambitious) when tackling a project like this. I have a lot of half-finished DIYs under my bed, which is honestly embarrassing. But I decided to make some nice looking neon skull lights for the upcoming Halloween.
Following the instructions, I prepared the surface dry and dust-free for the adhesive clips. Then I began to think about the configuration; the CYNC lights come with a paper grid to help map out the design (which I probably would have used if I had mounted the lights directly on the wall).
Unlike many other smart light strips, these neon rope lights are not themselves adhesive. Instead, it has plenty of little adhesive clips to help align and position the design. It took a little trial and error to figure out how best to position the clips to capture the curve of my skeleton, but overall, it was rather intuitive.
All in all, it took me only 15 minutes to create my design. With the extra rope left over, I could have figured out how to use the 16-foot strip as is, but I cut it to size with scissors. After several test cuts, it was suggested that if I did not want to compromise the endpoint LEDs in my design, I should leave about 2 inches
.
With the design complete, I hung the acrylic panels on the wall using heavy-duty command strips. The white adhesive is not too obtrusive, but if this were to be hung permanently, I would install standoff screws. If I were to hang the lights again next year, I would use clear adhesive, like I did when I saved my old Philips Hue lights from the trash.
Anyway, with the light fixtures installed, I could finally start the light show. By default, the strip is lit in a warm white color, which I thought looked very modern and classy. Hanging from the strip itself is a physical controller that repeats various light effects, most of which utilize distinct segments of the strip to display multiple colors at once.
But the CYNC Dynamic Effects Smart LED Neon Shape Light is also a smart light, so it pairs with the CYNC app and my Amazon Alexa home system and can be controlled by both app and voice. I set the timer to automatically turn off the light at 11 pm, so it is no longer on all night.
For about $150, and in less than an hour's time, you have a great-looking, neon-inspired Halloween decoration that costs hundreds of dollars or more. What's more, by mounting it on an acrylic board, the skull can be stored away after Halloween and taken out again next year. And best of all, you can take pride in having brought your vision to life.
.


Comments